In this tutorial, we are going to explain the concept of Django Template System. Before we begin with Django Template System, let us understand why do we need it.
In our last tutorial, we have explained how to run a simple Django Framework project and for those who have read that tutorial must have seen that we had to mix the HTML with the python code in a single file, which could lead to a lot of issues, especially when working on a LIVE project.
To rectify this issue, we could use the Django Template System, using which we could separate the HTML file, which is carrying the
presentation logic from the python file, which is representing the view function, and could link these separate files.
Let us create a Django project to explain you how to work with the Django Template System. For those who have not read our last tutorial, here is a recap.
Creating a Django project
To create a directory for our project, we need to open the Command Prompt and type in the command -
django-admin startproject django_proj1
dhago-admin is a management utility for Django Framework, using which we could create a new project and much more.
startproject is a command to start a new Django project.
django_proj1 is the name of our Django project and also the name of our project directory created in the current directory.
The startproject command gives us a sub-directory and files
Executing the startproject command has not only created a project directory named django_proj1, but has also created a file manage.py and another sub-directory
with the same name as the project directory, which also contains some Python files -
django_proj1 is the root directory of our Django project, also known as the container of our project.
manage.py is a command-line utility which allows us to interact with Django project in various ways.
django_proj1 sub-directory is actually a Python package for our project. We can import this package(a group of modules) and its contents just like we import any general Python package/module and its contents.
__init__.py is a file which allows our sub-directory django_proj1 to be treated as a Python package.
settings.py is a file used for setting the configurations for our Django project.
urls.py is a file used to specify the URL declarations for our Django project, also known as a a table of contents.
wsgi.py is a file used as an entry-point for WSGI web-servers to serve your project.
Starting the development server
After creating the project directory and the files required to run our Django project, it is time to execute the Django Development Server. To do this,
we will have to open the command prompt, change the current directory to the root directory of our Django project and execute the following command.
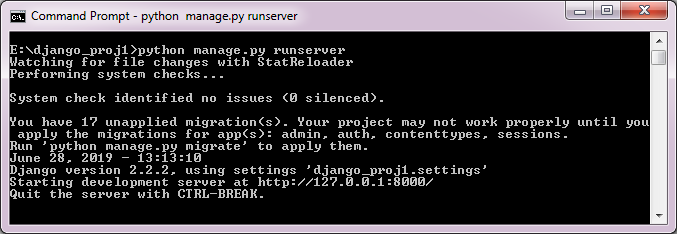
python manage.py runserver
Executing the above mentioned command will trigger the Django Development Server in action, as you can see in the picture below.
Note: Please ignore the warning of unapplied database migrations for now, we will talk more about it later in the section - Database with Django.
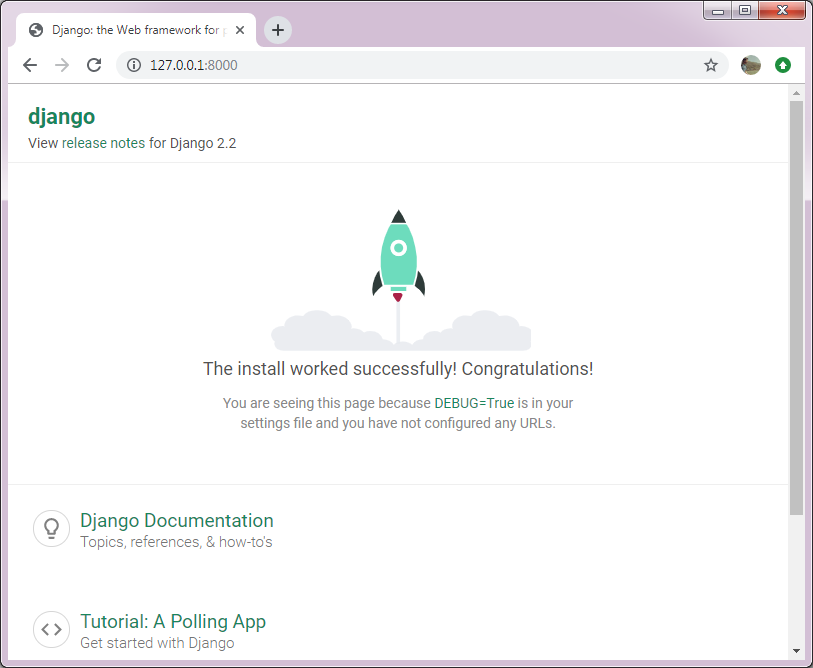
Now that you have successfully started the Django development server, it is time to visit the http://127.0.0.1:8000/ link and you will see a webpage displaying a congratulatory message, as shown below.
Note: The runserver command runs the Django development server at the port 8000.
Creating an app in our project
A project may contain one or multiple applications. As we have already created a project, now let us create a welcome application in it which welcomes the user. This application will be created right under our root - project directory django_proj1.
To create an application, we have to open another window command prompt, change the current directory to the root directory of our Django project and execute the following command -
python manage.py startapp welcome
The command startapp in combination with manage.py utility is used to create an app of a project, using which we have created an app named - welcome.
Executing the startapp command has not only created an application directory named welcome in the root - project directory, but has also created the following set of Python files -
Next, we are going to create an HTML template file for this application.
Creating an HTML template file for our app.
Next, we are going to create an HTML template file within our application folder welcome, we will name this file template.htm.
An HTML template file contains the static part(comprising the HTML output) as well as some special syntax describing how the dynamic content will be inserted into this HTML file.
template.htm
<html>
<head><title>Django Template System - Decodejava.com</title></head>
<body>
<p>Dear {{ msg }},</p>
Welcome to the tutorial of {{ topic }} at {{ website }}.
This tutorial was written on {{ date }}.
<br/>
Hope you are going to like it. If yes, please like and share.
<br/>
<br/>
Best wishes, <br/>
{{ signature }}
</body>
</html>
In this HTML template file, we have specified some variables(e.g. topic, website, date, signature, etc.) within the double curly brackets {{ }} are each a specific key in this dictionary, whose values are also defined and accessed from a view function(we are going to create it next).
Creating a view function for the app
Once we have created the HTML template file in the application, we will also need to create a view function associated with it. A view function is simply a Python function which takes an HttpRequest from the HTML template file and returns an HttpResponse with the values of the variables specified and requested by the HTML template file.
Note: This view function is defined in the file view.py, which is already created and stored in our application directory, welcome. Let us just copy and paste the following code in view.py.
We have named this view function - dict_lookup().
view.py
from django.shortcuts import render
import datetime

#The view function - templ()
def templ(request):
    #Creating a dictionary of items
    dic = ({'msg': 'Reader',
    'topic': 'Django Template System',
    'website': 'Decodejava.com',
    'date': datetime.date(2019, 7, 5),
    'signature': 'Admin - Decodejava.com'})


    #Calling the render() method to render the request from template_ex.htm page by using the dictionary, dic
    return render(request, "template_ex.htm", dic)
Understanding the code in view.py :
First, we have imported the render function from the django.shortcuts module and next we have imported the datetime module.
Next, we have defined a view function named - templ, which takes an HttpRequest object in its parameter and we have named this parameter - request.
Note:Each view function takes an HttpRequest object in its first parameter and it could named anything but its typically named - request.
In the view function, we have simply created a dictionary(dic) of items of key:value pairs, where each key(e.g. msg, dic, topic, website, date, signature) is assigned a value.
Note:In the HTML template file, each key is used as a variable name to access the its value specified in the dictionary(dic).
To initiate the process of rendering, we call the render() method, which replaces variables in HTML template file with their values, which are looked up in the Context(a parameter to the render() method).
The render() method requires three parameters passed to it:
Request - An incoming request.
Path to the HTML template - This is a path relative to the path specified in settings.py file.
Context - Since, Django 1.8+ version, the render() method takes a Context, which should be represented by a dictionary of items needed in the template.
On call, the render() method renders the request from template_ex.htm page and it has returned an HttpResponse object with the rendered text by using the items of dictionary(dic), which is then eventually returned back by the view function - templ().
Mapping URL to view
After creating the view function of an application, we need to specify the mapping between a URL and this view function in a file named - urls.py. The file urls.py is simply coded in Python and we will have to create the urls.py file in the folder of our application, welcome.
The use of mapping a URL to the view function is, when this URL is requested by the user, its mapped view function is executed and a response is returned.
urls.py
from django.urls import path
from . import views

urlpatterns = [
        path('', views.templ),
]
As you can see in the file urls.py, we have imported the path() function from the module django.urls.
The path() function has been passed the two must arguments -
An empty string to specify the URL pattern, specified by ' '.
This URL pattern specified in the application's urls.py file is the relative path to the template. This path gets added to another URL pattern, specified in the project's urls.py file(we are going to create it next), and the combined path will be matched to the view function - templ defined in the application's views.py.
Pointing the project url to application url
Next, we are going to point the project url(urls.py) to the application url(urls.py) by using the include() function. For this, we will open the file urls.py in the root - project directory, django_proj1, and copy-paste the following code.
urls.py
from django.contrib import admin
from django.urls import include, path

urlpatterns = [
    path('welcome/template/', include('welcome.urls')),
]
As you can see in the file urls.py, we have imported the path() and include() function from the module django.urls.
The path() function has been passed the two must arguments -
A string to specify the URL pattern - 'welcome/template/'. This is the relative path to the template.
This URL pattern, combined with the URL pattern defined in the application's urls.py will be matched to the view function - templ, which is specified in the application urls.py file(stored in the application directory welcome). Therefore we have used the include() function to include and refer to the application's urls.py file.
How to load the HTML template file.
Next, we are going to show how to load the above created HTML template file template.htm, which is stored within our application folder welcome.
To load the HTML template file, we need to specify its full path in the configuration file - settings.py, which is stored in the project folder. For our example, you can find this file in the sub-directory django_proj1 within our project django_proj1 i.e. - django_proj1/django_proj1/settings.py.
Within the settings.py file, you need to locate the property DIRS and copy-paste the full-path to the HTML template file against it, as shown below and save the file.
'DIRS': ['E:/django_proj1/welcome/'],
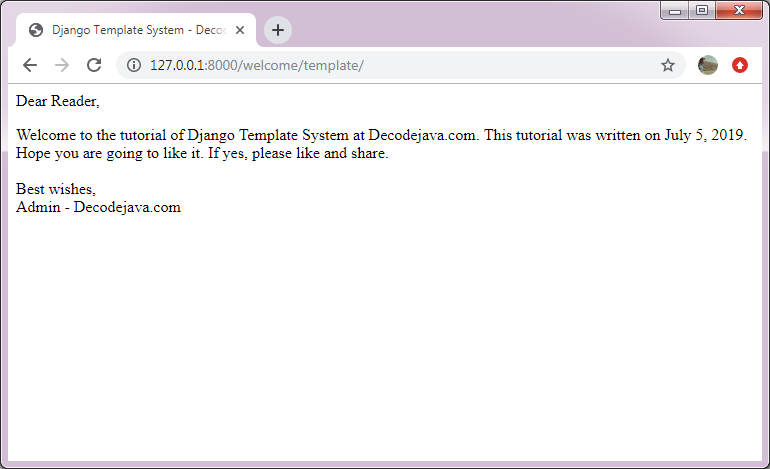
And finally, it's time to execute our Django project with templates.
As you can see in the picture, the string welcome/template in the URL is the URL-pattern which gets matched to the URL pattern specified in the project urls.py file, which calls the application's urls.py and its associated view function - templ(in the application) is executed and its response is displayed within the HTML template file template.htm.
Up next -
In the next tutorial, we are going to explain a situation when the django template system encounters a dot in a variable name, within an executing template. In such situation, django template System uses the dot lookups strategy. For more on this, please turn the page.